
Hey guys!
I’ve got a DIY tutorial for you all today: ombre roses in a shadow box. If you follow me on instagram, you might have seen a few versions of this already. This is the latest one!
So I bought a shadow box frame from Homegoods a few months ago and I was obsessed with doing something new and different with it. I’ve used one before to make a photo collage of me and my best friend, which I gave to her as a gift when she got married. But I wanted to do something different with the shadow box this time. I wanted to put flowers.

So I found a tutorial online and made them! The first one was a little botched because I didn’t have the correct varying shades of pink, and so it wasn’t really as ombre as it should have been. But it was a good experiment!

The next one I made for my mother in law. She wanted it in purple and so I found a pack of purple paper, which had 5 different shades of purple in it. I picked 3 of them and made the roses from that. For this one, she didn’t want a shadow box and instead wanted a regular frame. I found one that was similar at Homegoods with a removeable back that was deep enough.
And now I present to you this one: my final piece. This one is for my mom. I really hope she doesn’t read or see this before I see her because it’s her birthday present! I really hope she likes it 🙂
So if you know anything about me, you know that I love pink. And so when I found this beautiful 10 x 18 linen shadow box in Homegoods, I knew I had to buy it. And I knew the roses were going to be pink.
What I love about this project is how easy it is. It’s a bit time-consuming (the roses don’t roll themselves lol) but it’s fairly easy and it ends up looking so impressive in the end. Plus it’s such a nice gift to make someone that they can use to decorate their home.
Let’s take a look how to make this!

Here’s what you’ll need:
- a shadow box of any size
- paper in 3 or 4 shades of the same colour
- scissors
- a pencil
- a glue gun
- something round to trace
So you can pick any colour or style shadow box. The first one I used was blue and had a curved shape in the glass, but I picked a plain, long one for this project. You can also use a frame that opens from the back, like I used for the purple one. Just make sure it’s not a regular frame but one that is deep and can fit the roses.
To get the ombre effect, you’re going to want to pick paper in at least 3 or 4 varying shades. You’re going to roll your roses from light to dark. For a more gradient effect, you can go for 4 or even 5 varying shades. The easiest place to find paper in varying colours is Michaels. Also, make sure you get cardstock and not tracing or printing paper, since your roses aren’t going to hold up.
You’ll also need scissors, a pencil to trace the circle, and a glue gun with lots of glue gun sticks. You’ll need the glue for rolling your roses and then also sticking them on your background.
You’re also going to need something round to trace. For my roses, I used a 12 cm circle in a diameter; it’s just a circle of double sided tape. You could easily use a CD or DVD, a bowl or glass, or anything round really.

To begin, you’re going to trace your circle onto your paper. Start with the lightest colour and continue from there. After you’ve traced your circles on your paper, cut then out. I was able to fit 4 circles on one sheet of paper.


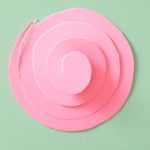

Once you’ve cut out your circles, you’re going to cut them in a spiral. Now, depending on how high you want your roses to sit, you can either do this in a wide spiral or a thin spiral. The difference is that cutting a wide spiral will give you roses that stand high while a thin spiral will give you roses that are more flat. Originally, I cut wide spirals only to place my roses in my shadow box and realise that they didn’t fit. The door of the shadow box wouldn’t close. So I cut thinner spirals the next time and they fit perfect. This all depends on the depth of your shadow box and this is something you’ll have to gauge with your shadow box.
Once you’ve cut your spirals, you can now begin to roll your roses! It’s actually quite simple. Starting from the outer piece, you’re going to start rolling your roses inward, counter clockwise. It won’t look like a rose yet. Keep it tight until you get to the very end, and then let it go gently. Let the layers expand slowly and keep your finger on it as you dab your glue on the bottom to secure all the layers or petals. Be careful not to burn yourself!
I wasn’t able to take a picture of myself doing this, so here’s a video tutorial to get a visual on this.
The great thing about making these roses is that each one is going to look slightly different. And that’s okay! That’s what creates the uniqueness of the project. All-together, they look beautiful.
Once you make your roses, don’t glue them to your shadow box yet. Instead place them inside and lay out the colours. You might have to make more or less of one colour, depending on how long or wide your shadow box is. Try to have an even number of rows of each colour, or if that’s not possible, go with one more row than the one before if. So if you have 2 rows of the light pink, have 3 rows of the medium, and then 4 of the dark. I didn’t plan properly and ending up having one extra row of my darkest colour in the purple one.

Once you’re pleased with your layout, dab some glue on the bottom of your rose and place it in the shadow box. Press down on it for a few seconds until you’re sure it’s secure. Do this for the rest of the roses.
Close the door to your shadow box and voila! You’re done. You can place your new beautiful homemade shadow box on a coffee table or display it on the wall. You can display the roses light to dark or dark to light. You can even hang it horizontal and have your roses go light to dark in a horizontal direction, rather than vertical. There’s so much you can do!

Depending on the size of your frame, rolling all the roses can definitely take time. But it’s a relaxing project that can be done nonstop on a Sunday, while watching a movie, or done over the course of a few days. You don’t need too many materials either; it can come together in under $20 which means it’s a lovely and thoughtful gift to give someone or to make for yourself!
So give it a try!
I hope you liked this DIY tutorial 🙂
Thanks for reading,
Ikhlas
Looks so cute! I can’t wait to try this. I think it would be a great experience for me. Thanks and keep it up!